Wednesday, August 21, 2013

Pokemon: 3D Krokorok {3D Head Mini Tutorial}

When my nephew Luke, who turned 8 (can't believe it, EIGHT!!) this past weekend, requested a Krokorok cake from Pokemon...I decided to go into 3D mode!!  (Well, first I went into Google search mode, because I had no clue what Krokorok looked like!! THEN I went into 3D mode! :)


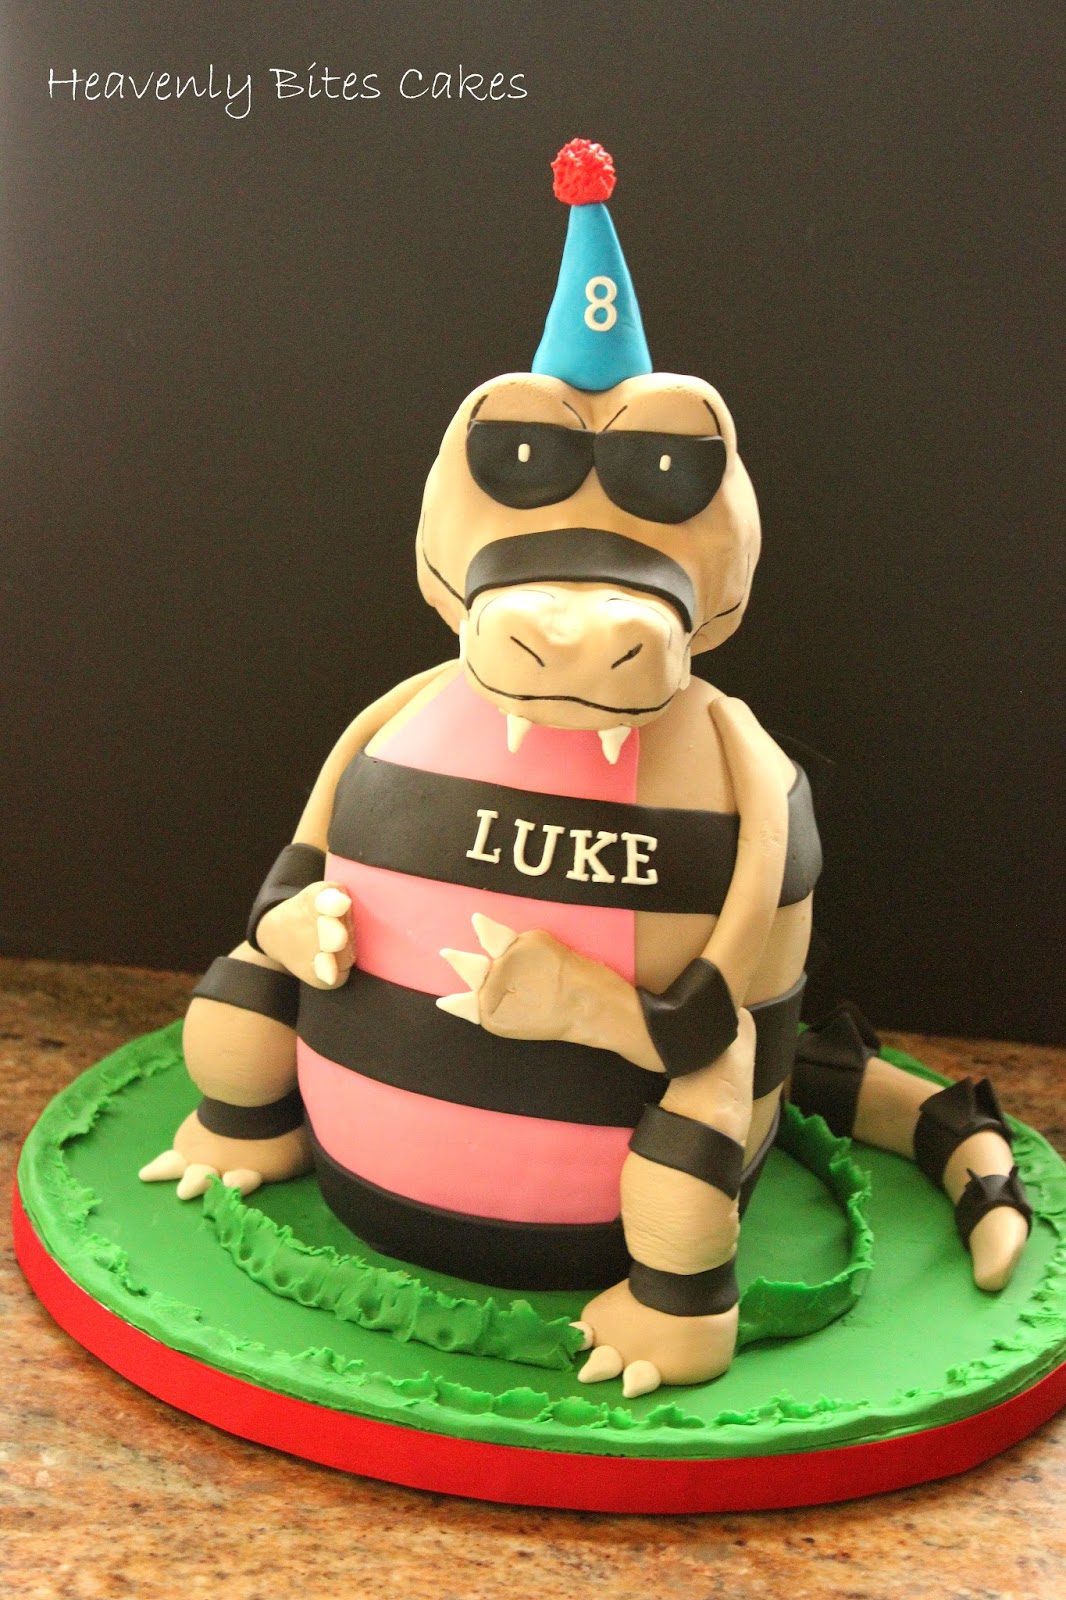
I could have definitely gone the easy route and made a tiered Krokorok themed cake, but when it comes to kids and their cakes, I love to see their eyes bug out when the character they requested shows up in 3D cake form. With 5 little boys in our family, the excitement level can sometimes goes through the roof and I love it!

Here is a pic of the birthday boy who is holding the head of Krokorok after the cake was demolished by our family! Happy Birthday Luke!!


I've found that the main trick to a 3D character cake is putting a LOT of time and effort into the head shape and facial features...that is truly what makes the character recognizable. I put a little tutorial together (see below) on how I did the head in case anyone is interested! I would have loved to get super technical and made this guy standing up on his own two feet, but I have not yet ventured into the art of cake boards made to defy gravity! Someday... :)

Mini- 3D head tutorial:
  • While the cake was baking I started working on Krokorok's head. I've taken to using floral foam balls from Michaels for the heads of 3D characters lately, just because the foam is so light on the top of the cake and easy to shape.  For this head, I started with an egg-shaped foam ball.
  • I printed out an up-close Google image of Krokorok's head and carved with a small serrated knife until I got a good basic shape. 
  • I then added features using gumpaste (in this case, higher eyes and some bumps for the end of the Krok's "nose") and allowed them to harden.
 
  • I liberally coated the foam and fondant in shortening, then added the tan colored fondant on top and let it set.
  • Once set, I added the facial features and decorations (eyes, mouth, stripes, etc).
  • I let the head set in the fridge and once the fondant was super hard, I placed the head on top of the cake to see what part of the bottom of the head I should put the dowel in for it to be placed on the cake properly...then I inserted the dowl into the bottom of Krok's head.
  • Once Krokorok's "body" was covered and placed on the cake board, I put the head on and it all came together! :)

I always try to wake up early on the morning of a cake delivery to shoot pictures in the morning light before my boys wake up...this time my son James came down to observe and had a few questions for me..."Did Luke ask for there to be grass underneath Krokorock?" Ummm, no...I hope I didn't make a Pokémon faux pas! :) Luckily, the birthday boy didn't seem to mind!


Happy 8th birthday Luke!
 
Thanks for coming to visit!!
 
Tara

Sunday, June 23, 2013

Mod Butterfly 3rd Birthday Cake

It's been awhile since I've dusted off the old blog, but today's adorable Mod Butterfly themed 3rd birthday cake was so fun to make, it gave me the inspiration to brighten up this space with this new cake! :)


Lily's mom chose the most adorable butterfly themed party goods, so the cake design was inspired by the bright colors and butterfly graphics!  Here is a glimpse of the party plates from Beaucoup.com!


We decided on a cake design incorporating all the bright stripes and dots and the cute little butterfly as a main focal point.


I incorporated Lily's name and age on the other two tiers and tied the design together with stripes on the top tier and cute little butterflies dotting the cake.


For a party favor, I made butterfly shaped cookies to match the cake - so fun!

Delivering the cake this morning was great! I got to meeting the birthday girl and she was such a cutie pie and was so friendly saying hello to me and my boys who accompanied me on the delivery!

Wishing Lily a very Happy 3rd Birthday party and a wonderful year ahead!


Tara

LinkWithin

Related Posts with Thumbnails